Text, Scripture, Songs, Media, and Cameras run locally without a product account.
Managed streaming is a separate, server-configured service. OBS remains your compositor and encoder.
The operator guide
Run the whole service.
Read in order once. Jump straight to the dock you need during rehearsal.
01 · Get oriented
Controls are not the output.
The docks are your operator workspace. The installed output sources belong in your OBS scene. Viewers see the scene on OBS Program, not the dock you are clicking.
Prepare in the dock
Search Scripture, write a message, or select media and cameras before showing them. Songs behave differently: loading a song or advancing lyrics can update text already on screen. Clicking a verse or lyric cue can show it immediately.
Check OBS Program
Keep the installed output sources visible in the scene you are using. A dock’s “live” state is not proof that its source is visible on Program. In OBS Studio Mode, Preview and Program are different.
Hide the right layer
The top Show/Hide toggle controls shared Text, Scripture, and Songs output. Hide media and camera hide actions are separate. None stops OBS streaming.
Before the service: rehearse a cue, check it on OBS Program, then hide it. Keep media and camera visibility separate from text. The dock Size slider changes the controls, not the output text size.
Real, locally rendered Emberstage UI—not mockups. All operator state, song text, media, names, and streaming data shown are examples. Camera thumbnails are illustrative; no camera hardware, OBS connection, or provider broadcast was used. Amber numbers match each screenshot’s caption. Select an image to view it full size.
02 · Scripture
Find the passage. Take the verse.
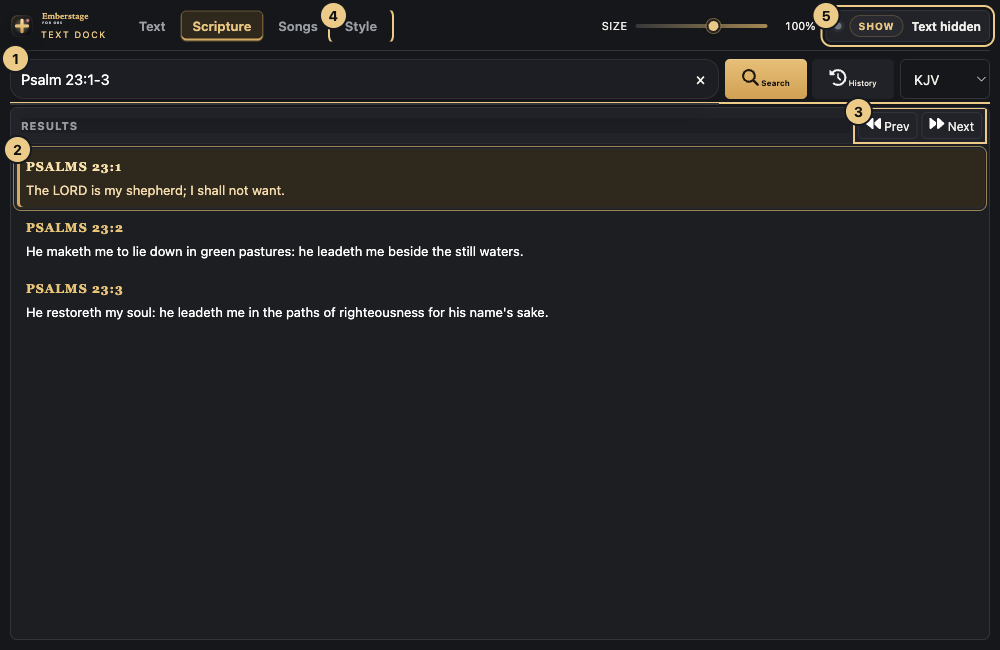
Search. Open Scripture, choose the Bible version, then enter a reference such as Psalm 23:1-3, a chapter, or words from a verse. Press Enter or choose Search.
Take. The first Enter searches and focuses the first result without showing it. Press Enter again on the focused result—or click a verse—to show it. Repeating the same live cue hides it.
Navigate.Prev/Next and left/right arrows select the next verse without taking it. Keep keyboard focus out of the search field; click or Enter takes the selected verse.
Set the look. Open Style → Scripture broadcast look, choose the mode and branding, then Apply broadcast look. Restore legacy returns to the legacy look. Use the top Show/Hide control to clear or reveal shared text.
1 Search · 2 Verse cue · 3 Select previous/next · 4 Style · 5 Shared text visibility. This capture is after the first Enter: the verse is selected; text is still hidden.
03 · Songs
Load the song. Follow its parts.
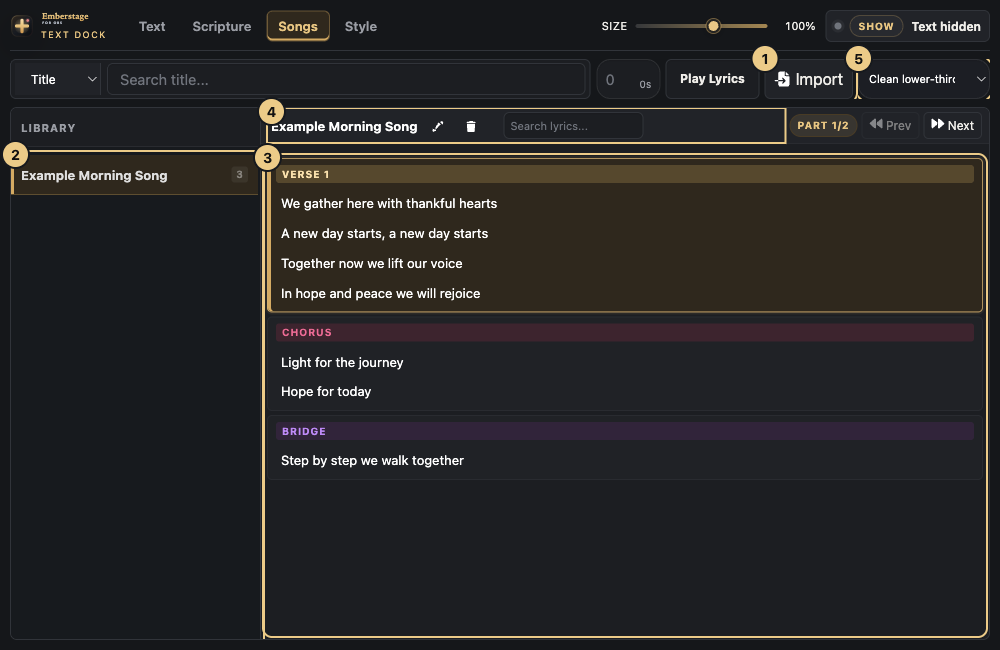
Load. Use Import for one or more .txt files. A Title: line names the song; headings such as [Verse 1], [Chorus], and [Bridge] divide sections.
Select. Search the Library by Title, or choose Lyrics to search words across the library. Loading a song sends its opening cue and can replace text already on screen; hide shared text first if you are preparing privately. The separate Search lyrics… field searches the loaded song.
Take and move. Click a section or lyric line to show a cue. Repeating the same live cue hides it. Prev/Next and up/down arrows advance the output—not just selection. If text is hidden, click a cue or use Show to reveal it. Compact looks split longer sections into two-line parts—watch PART. With line-by-line mode enabled, cues stay single lines.
Choose the look. Use the song-look dropdown for Full screen, Clean lower-third, Soft gradient strip, Compact lyric card, or Side panel. To advance automatically, set a positive number of seconds and choose Play Lyrics; Stop stops the timer, not the text output.
Edit or delete. The pencil opens Edit Song; update the title/lyrics and choose Save. The trash button opens a confirmation before Delete. Both update the local library—not the original file or the already displayed output.
1 Import · 2 Local library · 3 Sections and lyric cues · 4 Edit, Delete and loaded-song search · 5 Song look. The example’s four-line verse becomes two compact parts.
04 · Text
A quick message, with a deliberate take.
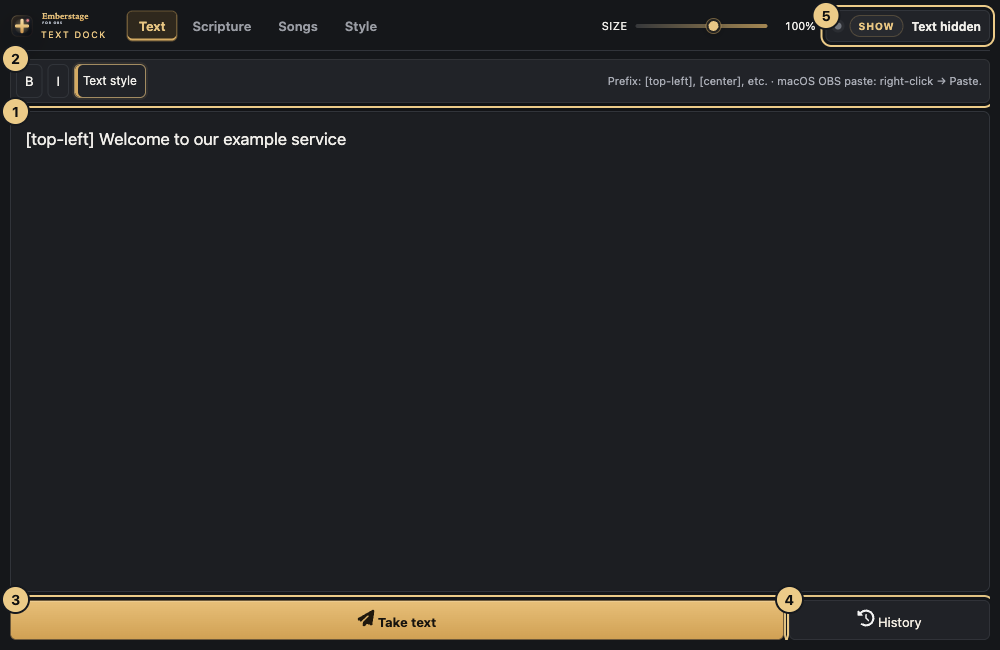
Write. Open Text and enter a message. Use B and I for formatting. Position prefixes such as [top-left] Welcome or [center] Prayer begins now place the message.
Style. Open Text style for Legacy, Lower third, or Full-screen card, church name/logo, and entrance/exit settings. Choose Apply broadcast look; Done closes the dialog. Restore legacy resets the look.
Take. Choose Take text to send the draft and make text visible. Taking the same already-live message again hides it. History loads the sent-message history into the editor; edit it and take the draft when ready.
Clear the screen, not the draft. Use the top Show/Hide toggle. It controls the same output used by Scripture and Songs, without hiding media or cameras.
1 Draft and position prefix · 2 Formatting and Text style · 3 Take text · 4 History · 5 Shared text visibility. Typing alone does not take the draft.
05 · Media
Bring in a still or clip. Choose its frame.
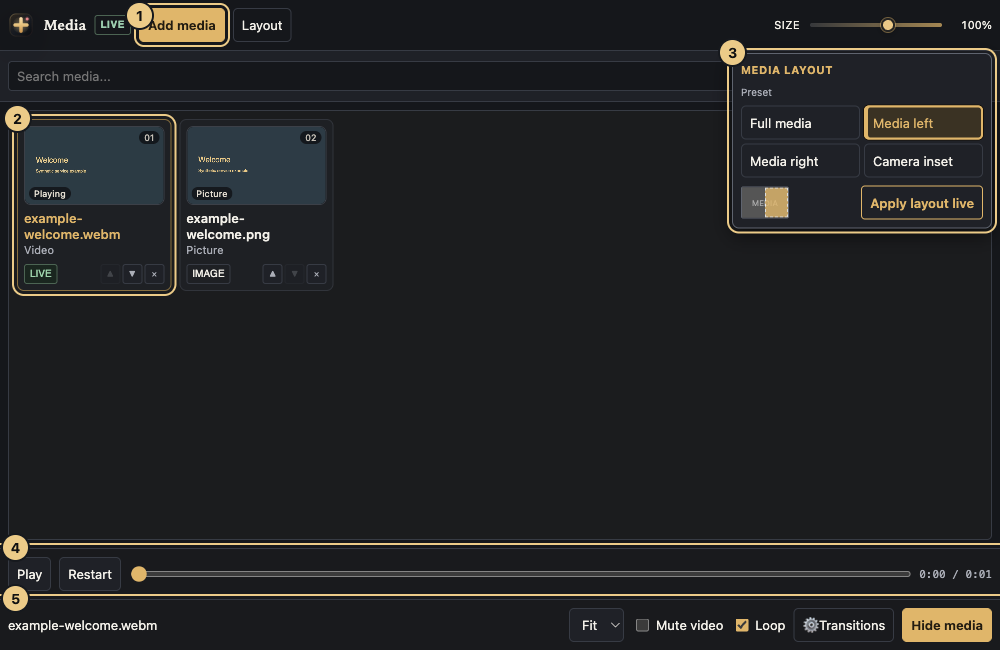
Add. Choose Add media for JPG, PNG, GIF, WebP, MP4, or WebM files. The library lives in the local OBS browser storage context. Select a card, then Show media; selecting alone does not show it.
Size and play.Fit keeps the whole image visible; Fill covers the area and may crop edges. For a live video, use Play/Pause, Restart, or the seek bar. Mute video and Loop control sound and repetition.
Share with a camera. Open Layout: Full media, Media left, Media right, or Camera inset. Choose the inset corner where offered. For a live item, choose Apply layout live; otherwise the layout applies when you show it.
Hide. The live item’s action becomes Hide media. A media/camera layout needs a camera shown from the Cameras dock; choosing the layout does not select or start one for you.
1 Add media · 2 Selected item · 3 Layout and Apply layout live · 4 Playback and seek · 5 Sizing, sound, loop and visibility. The LIVE state is simulated; these generated files were not shown in OBS.
06 · Cameras
One camera, or two in the same scene.
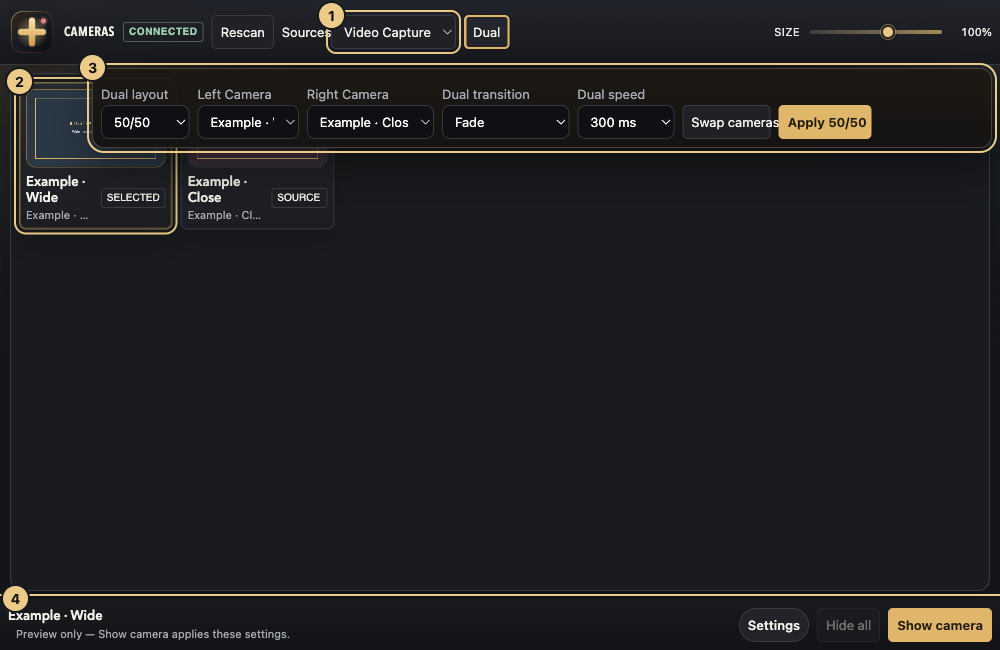
Find sources. Add your camera/capture inputs in OBS first, then Rescan. Video Capture filters normal camera sources; All sources also exposes other OBS inputs. The dock uses the local OBS connection, not browser camera permission.
Show one. Select a camera. In Settings, set Framing to Fit or Fill, plus Transition and Speed; then Show camera. It uses the full frame unless live media is sharing it. The same live single camera gets Hide camera. Selection/framing changes alone do not apply them.
Show two. Open Dual, choose 50/50 or Big + small, and assign two different cameras. Set the small-camera corner where offered, transition and speed; Swap cameras reverses assignments. Choose Apply 50/50 or Apply big + small.
Unapply or hide. When the settings match the active dual layout, its button becomes Unapply 50/50 or Unapply big + small; changed settings must be applied first. Unapply restores the prior single camera (or the left/big camera if none was saved); it does not hide cameras. If the saved camera is no longer available, the dual view stays active and a notice explains why. Hide all clears Emberstage’s camera output. These actions do not switch the OBS Program scene; unrelated OBS source visibility remains separate.
1 Source filter · 2 Selected camera · 3 Dual assignments and Apply · 4 Single-camera settings and visibility. Thumbnails, names and CONNECTED status are illustrative; no hardware or OBS service was contacted.
Not visible? Check the installed Emberstage output in OBS Program and its source visibility. A selected camera is not a shown camera. Text, media, camera composition, and the encoder each have separate controls.
07 · Managed streaming
Ready locally? Connect your destinations.
Only for a configured managed-streaming server. Local docks do not need pairing or a cloud login. OBS sends the video; Emberstage manages the approved destinations.
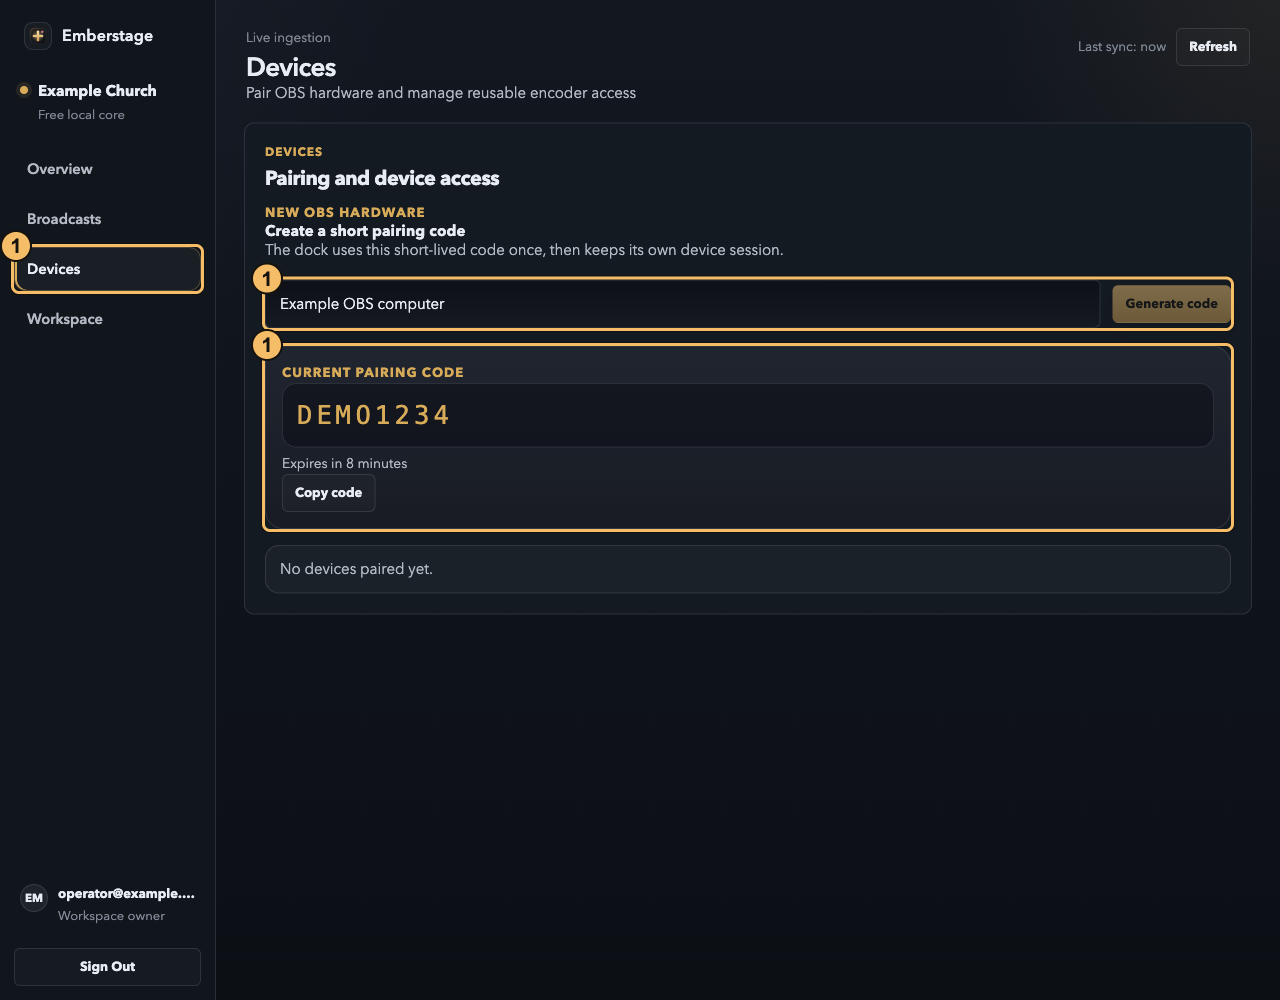
1 Open Portal and create a pairing code
Click Open portal in the Streaming dock and sign in to the correct workspace. Go to Devices → Pairing and device access, name the OBS computer, then click Generate code. Already paired to the right workspace? Skip to step 3.
1 · Create your pairing code. Example workspace and code only; generate your own in Devices. Pair the dock before setting up its OBS key.
2 Enter the code in the Streaming dock
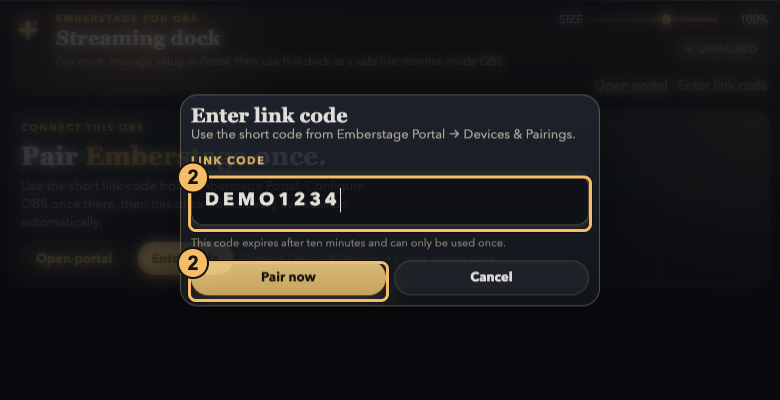
Inside OBS, open Streaming, click Enter code, paste your portal code, then click Pair now. The code expires after ten minutes and works once. Check the paired workspace and device before continuing.
2 · Pair inside the dock. This example code is not a working credential. Enter your own short-lived portal code.
3 Approve only the destinations you want live
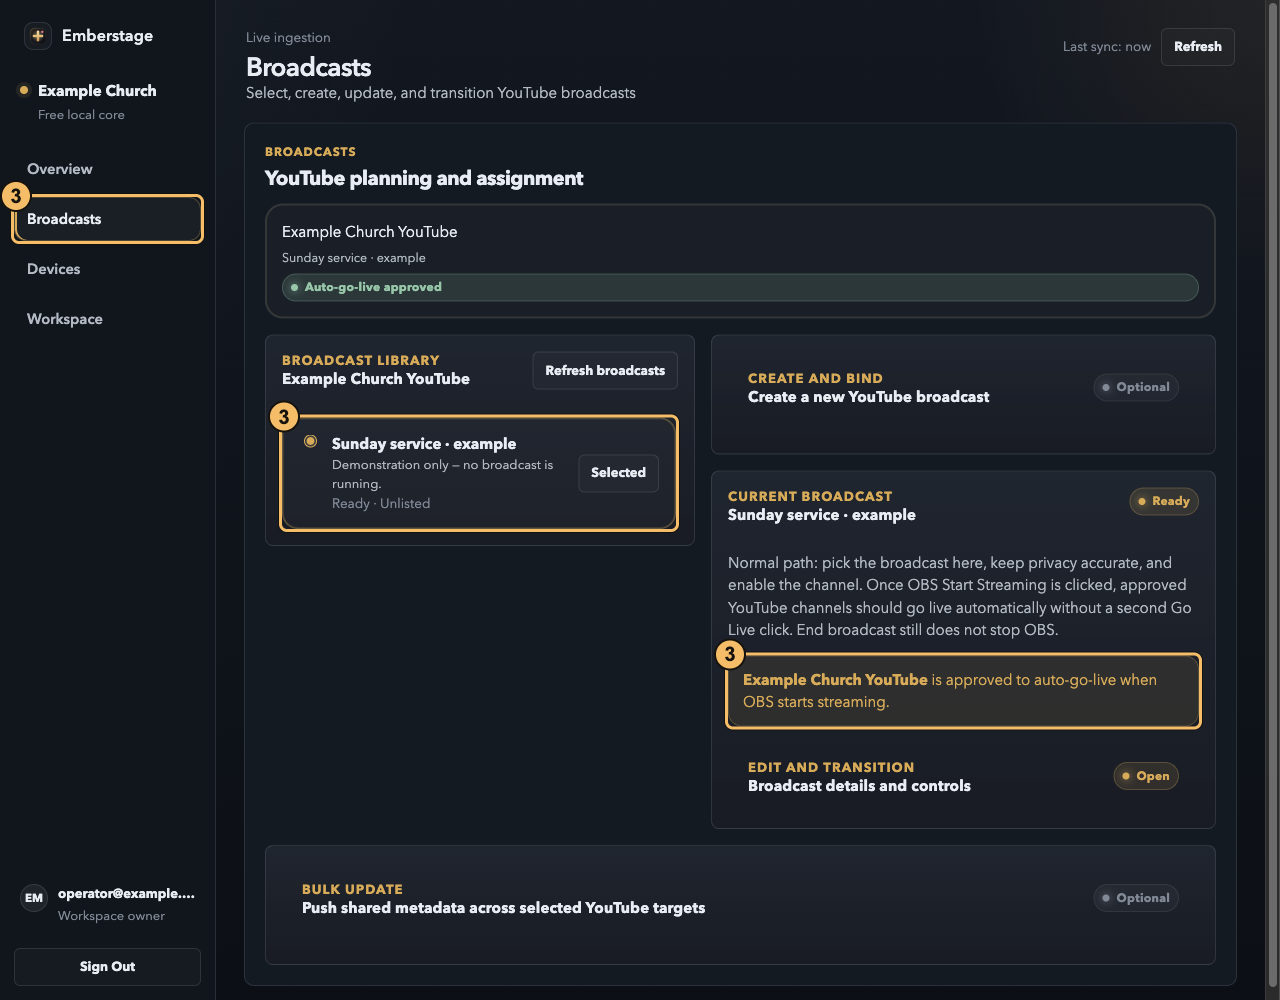
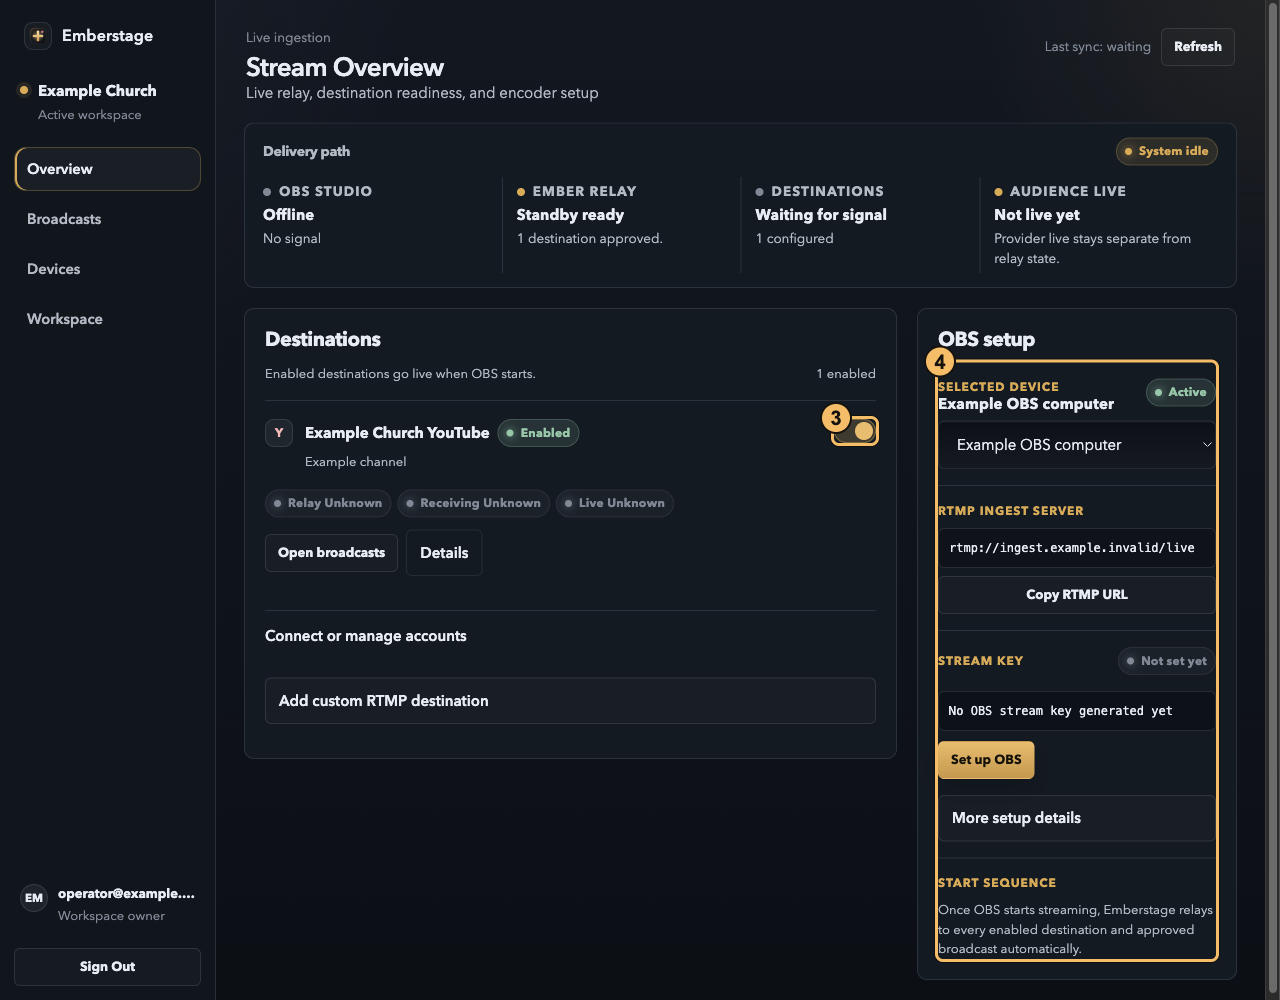
In Portal → Overview → Destinations, connect accounts available on your server, or add custom RTMP. For YouTube, open Broadcasts: choose the channel, click Use this on an existing broadcast or Create and bind broadcast, and check its privacy. Return to Destinations and enable only intended channels. Selecting a broadcast is not the same as approving its channel.
3 · Choose the YouTube broadcast. Example channel and unlisted broadcast; nothing is running. Channel approval is a separate Destinations toggle. Review privacy before enabling it.
4 Configure OBS once
After pairing, open Portal → Overview → OBS setup and select this active device. Click Set up OBS if it has no key yet. In OBS Settings → Stream, choose Custom, paste the portal’s RTMP ingest server and stream key, and apply. Keep the key private; do not rotate a working key just to follow this guide.
3–4 · Approve the channel, then configure OBS. Example paired device before key generation. The marked toggle approves auto-go-live; Set up OBS generates its key. The example ingest address is deliberately nonfunctional—copy your own server’s values.
5 Start from OBS, monitor in the dock
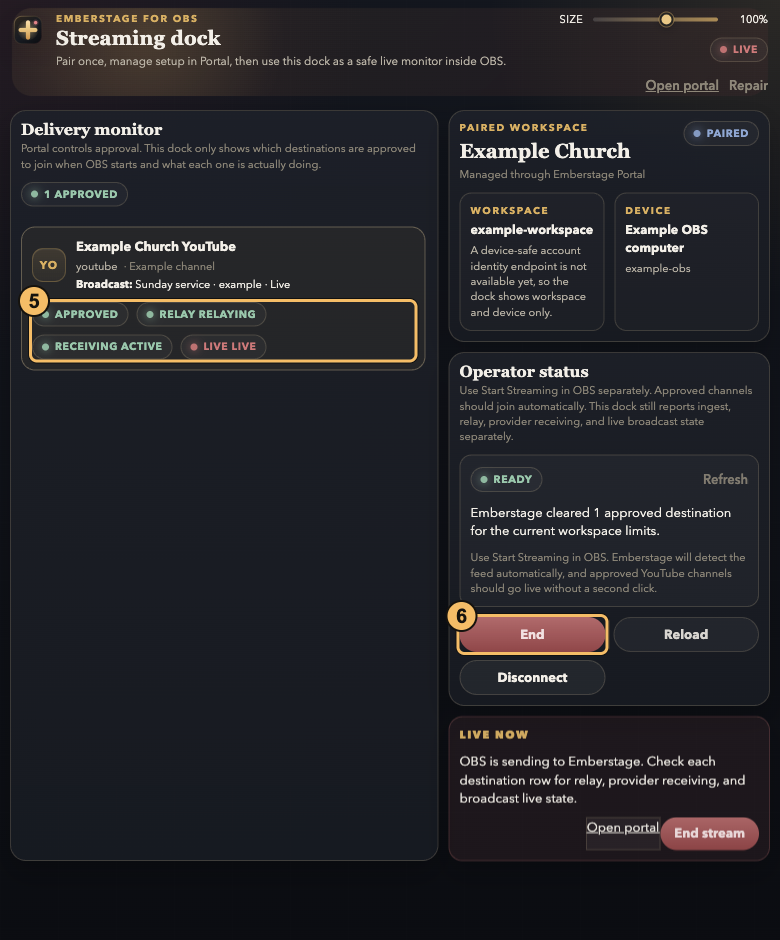
Confirm the dock is paired and readiness checks pass, then click Start Streaming in OBS itself. Approved YouTube channels should go live automatically without a second Go Live click. Watch each destination’s relay, receiving, and live status separately: a working relay alone does not prove viewers are live.
6 End deliberately
Use the dock’s End action to end the managed session, and OBS Stop Streaming to stop the encoder signal. Neither the dock’s End nor Portal’s YouTube End broadcast stops OBS. Verify the destinations have ended and OBS is no longer sending.
5–6 · Monitor, then end. All live indicators are simulated data. Start Streaming and Stop Streaming belong to OBS, outside this dock; End only ends the managed session.
Before going live: correct workspace/device, only intended destinations approved, correct YouTube broadcast and privacy, current ingest/key in OBS, and readiness checked. These locally rendered portal/dock captures use example data only—no real accounts, keys, or broadcasts.
Simple pricing
Free at the lectern. US$2 to take it further.
Keep your local OBS tools. Add streaming control when you need it.
Emberstage Free
Yours to keep
US$0 forever
Everything you need to put your service on screen, right inside OBS.
Local-first Scripture and song operation
Shared text visibility and dedicated media/camera controls
One workspace. One OBS start. Your approved channels go live together.
Up to 3 paired OBS devices
Up to 3 simultaneous destinations
1 active broadcast per workspace
Connected accounts, broadcast setup, and relay status
Cancel anytime; keep access through your paid period
Billed monthly in NGN through Paystack when checkout is enabled. No payment is taken on this page.
Pro covers the streaming control service, not unlimited hosted bandwidth. A configured relay and eligible provider accounts are required. Local OBS tools and saved settings remain yours if Pro expires.
Provider status
Know what is available.
YouTube
Configuration-gated
Connected separately in Streaming Setup when YouTube credentials and approval are available.
Facebook Pages & Profiles
Configuration-gated
Connected separately in Streaming Setup. Supports Pages and personal profiles (requires publish_video permission and reauthorization if missing).
Twitch
Configuration-gated
Connected separately in Streaming Setup when Twitch credentials are configured.
Instagram
Unavailable
Not supported here. No connect button, no promise, no workaround copy.